Industrial Laser Marking Systems / Laser Markers
Laser Cutting
Laser cutting is gaining popularity as the strength of a laser is more efficient and creates cleaner cuts than a non-laser cutting machine. Laser cutting can be done using a laser marker. Learn about laser cutting, the process that uses laser light to cut a target, through various marking examples.
What is Laser Cutting?
Laser cutting is a process that uses laser light absorption to melt or vaporise a material to leave behind a clean cut. The clean cut combined with the laser beam’s precision makes laser cutting ideal for industries with strict tolerances and top-tier quality.
Laser cutting machines are operated by computer numerical control (CNC) instead of manual labour. The laser cutting process doesn’t require preparation or consumables like oil, water, or blades. As a versatile cutting method that works on wood, metal, resin, acrylic, and film, laser cutting replaces saws, torches, and grinders.
Film processing
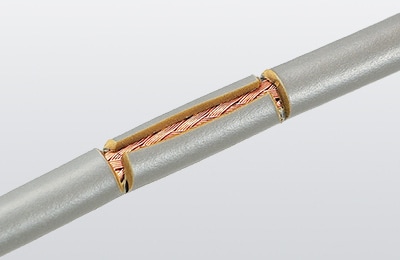
Wire sheathing cutting
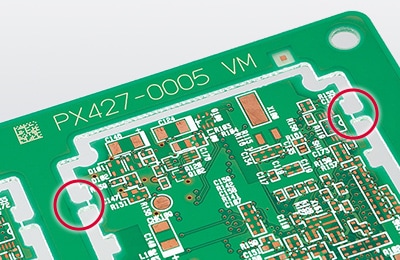
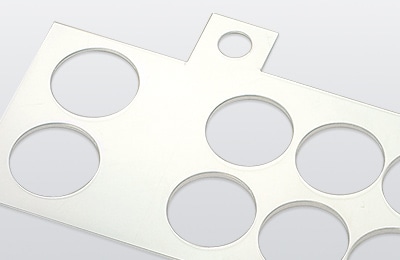
Cutting PCBs

Basic Principles of Cutting Using Laser Markers
Gate cutting
Lasers can cut materials by melting or evaporating a target surface, thus producing a cut. Generally, non-laser cutting machines require a die or blade. These contact-based methods run the risk of distortion during processing, especially for thin or fragile parts. Laser cutting is non-contact, so the risk of distortion is minimal. This makes laser cutting suitable for processing targets like thin plates and films.
Laser cutting should be done with a high-powered laser to prevent damage. Two different lasers can be used for cutting; a CO2 laser or a hybrid laser. Taking advantage of the strengths of each laser when laser cutting is critical to success. Using a CO2 laser is better for the general processing of film and plastic, while a hybrid YVO4 laser is better for the thin processing of metals. These laser types can be used separately for different projects or together in one project for different parts of a material.

Laser Cutting Machine

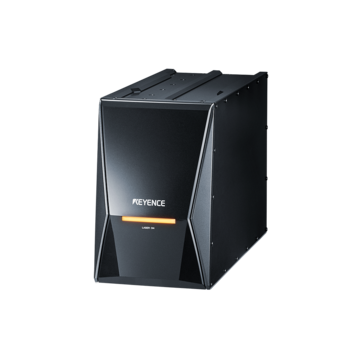
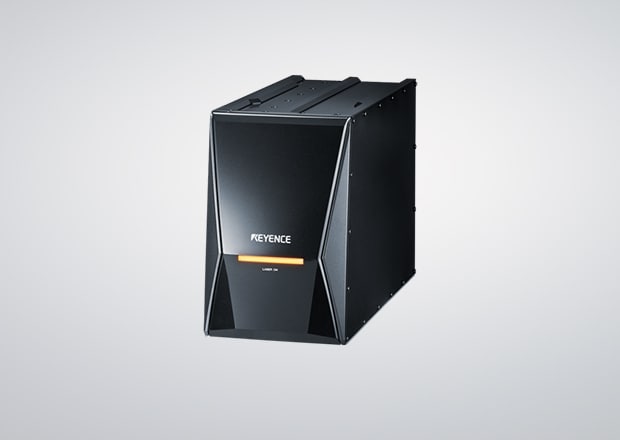
3-Axis CO2 Laser Marker ML-Z Series
The 3-Axis CO2 Laser Marker ML-Z Series is one of KEYENCE’s laser marking machines that can be used for laser cutting. The laser processes CO2 in a tube and then generates plasma between a reflexive mirror and an output coupler. The plasma then hits materials, and the material absorbs the light.
The ML-Z Series uses 3-Axis technology and a CO2 laser to cut surfaces smoothly. The ML-Z can do a variety of cutting, such as sheathing cutting, gate cutting, film cutting, and hole cutouts. With the Z-MAP function, any shape can be imported into the laser marker, even if it is unconventional.
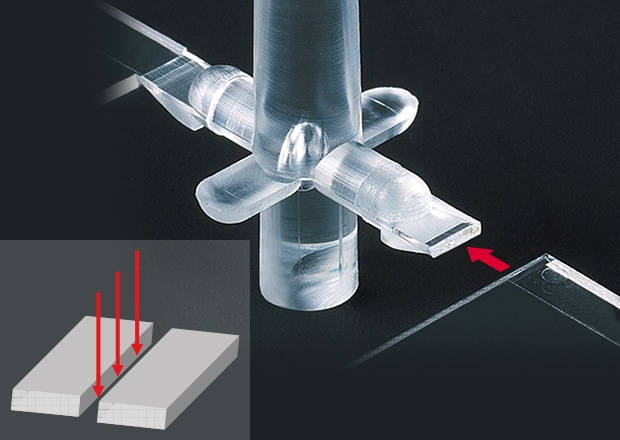
The thin beam model of the ML-Z has a smaller spot diameter than conventional lasers or die and blades. Because of the small spot diameter, the ML-Z can use greater power density. In turn, the power density cuts materials seamlessly without distortion or ragged marks. Additionally, the ML-Z’s short wavelength allows for even higher absorption, which is especially necessary for materials like resin.
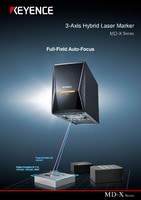
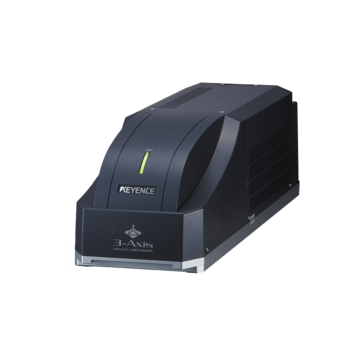
3-Axis Hybrid Laser Marker MD-X Series
The 3-Axis Hybrid MD-X Series is another one of KEYENCE’s laser marking machines that can be used for cutting. The MD-X uses 3-Axis technology with a fibre and a YVO4 laser.
The YVO4 laser provides a high-quality beam, while the fibre laser provides a high-output beam. These lasers combine to make a high-powered laser that processes materials seamlessly and efficiently.
Because the MD-X is a hybrid laser, the peak power is twice that of a conventional YVO4 laser. The high peaked power with the short pulse minimises heat damage. The minimal heat damage results in damage-free processing with sensitive or thin materials.
The MD-X can process a variety of materials, such as resin, metals, and thin film.
Laser Cutting System
KEYENCE’s laser cutting machines use patented systems with features like the 3-Axis control and autofocus to make cutting more efficient and precise.
The 3-Axis control reaches an area of 300mm x 300mm, which is optimal for large production. Since the 3-Axis control standardises the target area, the laser cutter can work on a variety of shapes, sizes, and materials without inconsistency.
The autofocus technology allows for efficiency as it removes the need for physical realignment and tracks the positional and focal deviation of each target. While tracking, the marker automatically adjusts to ensure consistency for manufacturing. The focal distance adjustment allows for flexibility with changes in product sizes, 3D shapes, and material inconsistencies.
Get detailed information on our products by downloading our catalogue.
View Catalogue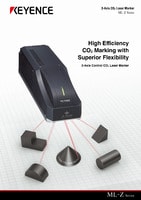
Laser Cutting Applications
A laser cutting machine can cleanly cut metal, resin, wood, and film. Laser cutting is reliable for these materials, regardless of properties that make them susceptible to deformities or jagged edges. Since lasers have micron-level precision, even industries with tight tolerances benefit from laser cutting.
Stainless Steel Medical Devices
The medical device industry frequently uses stainless steel because of its anti-corrosive and biocompatible properties. However, steel’s hardness makes it a difficult metal to process with traditional cutting tools. The hardness makes cutting thin stainless steel, with contact-based methods, especially prone to producing scrap.
Laser cutting with a hybrid laser is powerful enough to take stainless steel past its melting point and produce a clean cut. Since lasers are precise and include flexible beams, laser cutting easily cuts intricate and clean designs for medical devices.
Aluminium EV Components
Aluminium is a popular metal for EVs because of its lightweight, recyclability, and conductivity. However, it is susceptible to thermal expansion and potential deformation if processed with too much force or heat.
Laser cutting aluminium is a protection against distorted aluminium. As a no-contact method with minimal heat transfer, laser cutting does not affect any part of the aluminium besides the target area. The precision of laser cutting also ensures that components are held to tight industry standards. A hybrid laser cutter machine is trustworthy for batteries and body components.
Film
Film is susceptible to deformation from mishandling or sustained high temperature. Laser cutting combats this with less handling and minimal to no heat transfer for clean cuts. A CO2 or UV laser cutter machine cuts film for bonding, stress absorption, and electronic assemblies without affecting the entire film.
Paper/Cardboard
When you cut paper/cardboard, there are multiple properties to consider. Moisture, grain, knots, friction, and stiffness are all barriers to getting a clean cut with a torch or saw. Paper/cardboard susceptibility to jagged edges is high if all factors aren’t considered.
Cutting with a CO2 laser cutting machine does not have the same risks. Paper/cardboard absorbs the 10600 nm beam well and is cut cleanly without rough edges.
Implement Laser Cutting into Your Applications
Instead of having your shop floor filled with different kinds of saws and workstations, trade them all in for one laser-cutting machine. Laser cutting machines use light absorption instead of force to cut your materials cleanly. There’s no manual labour, scraps flying around, or long prep times; just a laser cutting machine precisely cutting your materials.
It’s time to make the switch to laser cutting. Contact us today to pick out your hybrid or CO2 laser cutter machine.